
Massive Parallelism with Cuda
Warning
The Cuda code in these examples that use the atomicAdd() function must be compiled with compiler flags that support atomic functions.
In general, architecture version 2.0 introduced a lot of very useful functionalility, and has been around sufficiently long that one can usually assume their card supports this level of functionality. Technically, atomic operations using integer arguments was first available in leve 1.1. Thus, to compile these programs, the command will look like:
nvcc -arch=sm_20 SOURCE.cu -o EXENAME (for architecture version 2.0)
nvcc -arch=sm_11 SOURCE.cu -o EXENAME (for architecture version 1.1)
Creator Name: Mark McKenney
Content Title: Introduction to the MapReduce Model of Parallelism
Learning Objectives:
- Describe the general architecture of a GPU.
- Explain the major, conceptual, architectural differences between a CPU and a GPU processor.
- Define the concept of a thread block in Cuda.
- Identify portions of an algorithm that are good candidates for parallelization.
- Design algorithms with threads that take advantage of GPU architectures.
- Explain the concept of thread divergence.
- Describe the basic outline of a Cuda program.
- Explain the aspects of thread communication that are unique to the GPU.
- Describe the concepts of grid, grid dimensions, blocks, and threads and how they relate.
- Use error checking on the GPU.
- Describe the memory hierarchy of the GPU.
- Use shared memory to optimize kernel.
Background Knowlege
- Ability to write, compile, and execute a C/C++ program.
- Ability to debug simple programs.
Resources Needed
- Access to a computer with a Cuda enabled GPU.
- Cuda drivers and the Cuda development kit (nvcc) installed on that computer
Work Mode
The module is self-contained. One may work through the document alone, or instructors can prepare lectures based on the information and samples.
In this document, we introduce GPU-style parallelism using Cuda and explore some solutions to the 3sum problem utilizing a GPU co-processor. We begin with a brief introduction to GPU architecture. Using GPU architecture as a guide, we introduce GPU programming using Cuda. Cuda is an extension of the C programming language that is created and maintained by Nvidia. Finally, we develop some solutions to 3sum using Cuda.
An Introduction to GPU Architectures
Section Goals
- Describe the big picture concepts related to GPU architectures.
- Describe the role of an accelerator in a computer system.
- Show how a piece of work can be split in a large number of threads.
The traditional computer architecture that we have considered in the multi-threaded discussions consists of a processor and a memory that communicate over a bus. The processor may have multiple cores, or may be multiple physical processors, but we have thus far treated the computing portion of this model as a single, logical processor, possibly with multiple cores, as shown in the following figure.
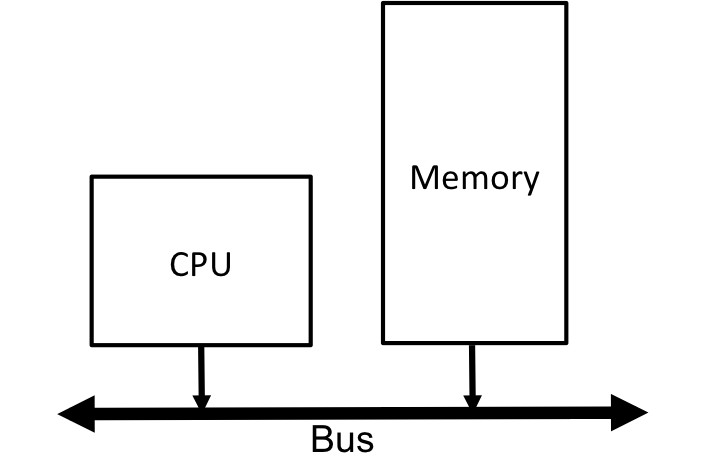
Fig. 1 A general architecture in which a CPU and memory communicate over a high speed bus.
The model of GPU programming we will explore using Cuda adds a second processing unit to the architectural model that attaches to the bus. Generally, this processing unit is may be referred to as an accelerator, and is not necessarily a GPU, although we will assume that it is. The GPU is a self-contained unit that has its own processing units and its own memory. The entire unit connects to the CPU bus as shown:
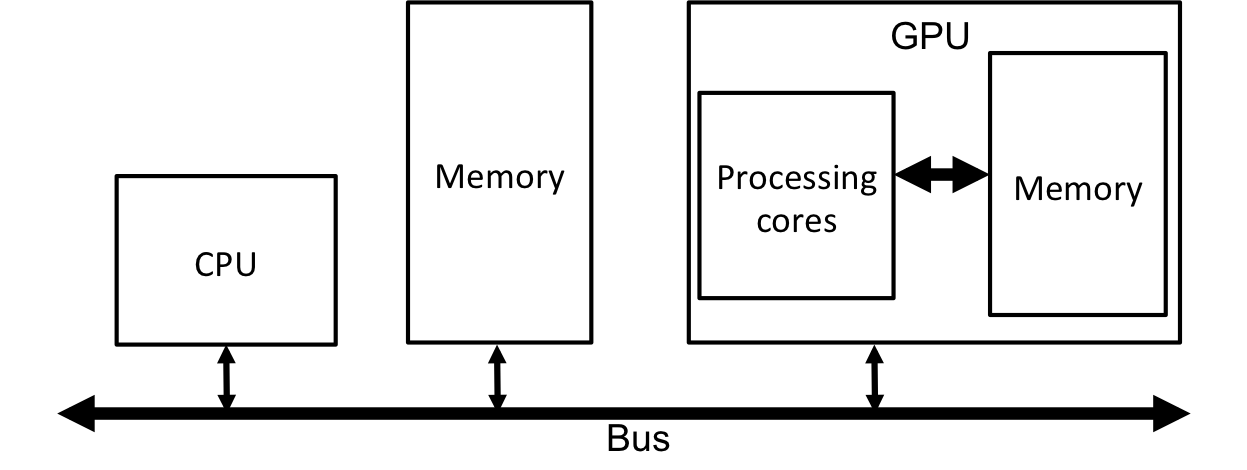
Fig. 2 An architecture in which a GPU is attached to the bus along with the CPU and Memory. Note that the GPU has its own internal computation and memory units that communicate over an internal bus.
The fact that the GPU has its own memory is significant; the GPU must have all data that it needs for its computations in its own memory! In fact, transfering data from the system memory to the GPU memory must be explicitly done by the programmer. Also, transferring memory between system and GPU memory can be a performance bottleneck, and must be managed carefully. Having a separate memory that must be managed by the programmer is the first major difference that we encounter when using accelerators.
Concept
The GPU has its own memory. In order for the GPU to process a piece of data, it must be explicitly transferred from the main memory to the GPU memory.
We denote the GPU’s memory: GPU memory.
We denote the main memory: Host memory or CPU memory.
The GPU memory is very similar to CPU memory: it is simply a set of storage locations with incrementally increasing byte addresses.
The GPU processing units are very different from a CPU’s processing units. In general, computer CPU cores are meant to be general purpose processors that are quite complex and can execute a large variety of algorithms efficiently. In a sense, each individual core on a desktop processor is designed to execute a single thread at a time (with exceptions for hyperthreading) and do all sorts of fancy tricks to re-order instructions, predict which way branches go, and identify and resolve data dependencies. A single GPU processing unit, on the other hand, is a simplistic processing core without the bells and whistles. Desktop CPUs take the path in which a few, very complex and powerful cores provide good performance: CPU cores these days have in the ballpark of 4-12 cores. The GPU takes the path in which each individual processor core is very simple, but there are very many cores: A GPU will have on the order of 2000 computational cores.
GPU processing cores are not independent, as are CPU cores. Groups of GPU cores are linked such that in that group of cores, all cores are executing the same instruction in the same clock cycle. Therefore, GPUs are very good at processing items in arrays in which each array element must have the same operations performed it. For example, if you wanted to increment every number in an array, the GPU could do this well since all cores would be performing the same operation (incrementing a value) on a different data element (each core gets one value from the array and increments it). You probably see that while a CPU core is good at large variety of algorithms, on certain types of algorithms work well on a GPU; particularly, algorithms based on array or matrix manipulations tend to be a good fit to GPUs.
Concept
So at this point, we know that:
- GPUs have a large number of rather simplistic processing elements.
- GPUs have their own memory and can only operate on data that is explicitly transferred into GPU memory
- GPU processing units are organized into groups such that each core in a group executes the same instruction in the same clock cycle (typically on a different piece of data in each processing unit).
These three concepts form the foundation for understanding how to effectively program a GPU (or other similar accelerator) for maximum performance.
Finally, lets look at performance. The architectures of CPUs and GPUs are very different, and thus they have very different performance characteristics. Intel haswell core processors have about .2 TFLOPS of theoretical performance. Thats about 200 trillion floating point operations per second. An Nvidia K40 has about 1.5 TFLOPS of double precision performance and 4.3 TFLOPS of single precision performance. As you can see, the GPU architecture is capable for achieving an order of magnitude more performance than a desktop processor. However, a GPU can’t get that performance for every algorithm! In fact, a single threaded algorithm or an algorithm that does not make use of the GPU architecture effectively will actually run slower on a GPU than on the CPU. Thus, in order to take advantage of the computational power of the GPU, we need to develop algorithms so that they can take advantage of GPU architecture, and divide the work in the algorithms effectively among processing core groups in the GPU.
The CUDA Computational Model
Section Goals:
- Explain the major, conceptual, architectural differences between a CPU and a GPU processor.
- Define the concept of a thread block in Cuda.
In the previous section, we talked about the differences in the processing cores of CPU processors vs GPU processors. In this section, we expand on that discussion by looking in a more detailed way at the architectural differences between CPU and GPU processor organization, and then seeing how GPU algorithms need to be structured to fit that architecture. Note that we used the term processing units to describe a single core on a processor in the previous section. From this point forward, we will create a few definitions to clear up the terminology:
- Processor
- A full processor with possibly multiple computational cores.
- Core
- A single computational core on a processor.
- Streaming processor
- In effect, a single core on a GPU processor. Although the concepts are not quite equivalent, conceptually they are similar.

Fig. 3 A typical CPU block diagram of both an entire CPU and a single core on a CPU.
A typical CPU block diagram looks like diagram in Fig. 3. As was mentioned previously, you often see on the order of 4-12 individual cores, and a decent chunk of cache memory. Note that each core is relatively large; this is because each core is complex, and generally only handles a single thread at a time (for more information on the cores, check out the following terms: processors pipelining, superscalar, and hyperthreading). Inside each core is more memory, some control logic, and then some functional units. A functional unit might be an ALU (add/subtract numbers, etc.), a floating point multiplier, a memory interface unit, etc. Basically, each functional unit provides some sort of basic functionality. However, because the core is meant for one thread, there is not a huge number of functional units, and it there is a lot of space dedicated to control and memory in an attempt to some complicated things to speed up thread execution (for more information look up the terms: data hazards, branch prediction, stall cycles, memory stall cycles).
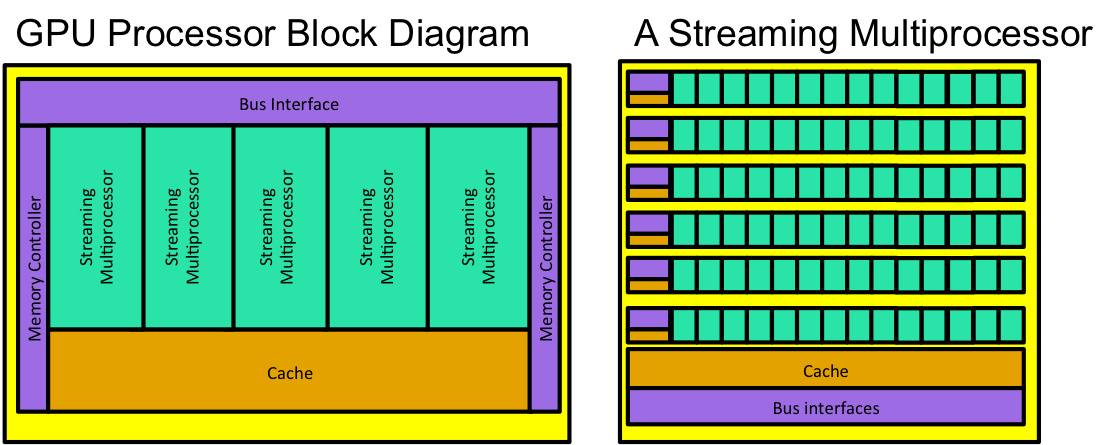
Fig. 4 A typical GPU block diagram of both an entire GPU processor and a single streaming multiprocessor (essentially a core).
A typical GPU block diagram is depicted in Fig. 4. Instead of a series of cores, a gpu processor has series of streaming multiprocessors, what Nvidia calls SMXs [1]. Looking at the diagram of a single streaming multiprocessor, the differences from a CPU core jump out. The SMX contains a bunch of functional units; however, a series of functional units is controlled by a single control unit with its own small amount of cache. Essentially, every functional unit controlled by a single control unit will be executing the same operations (add, subtract, multiply, etc.), during the same clock cycle. Even though they all do the same thing in the same clock cycle, they are all doing it to different pieces of data (again, remember the example about incrementing every element in an array). So, instead of a CPU core executing a single thread at a time, the SMX actually executed many threads simultaneously. However, those threads need to be executing the same instruction in the same clock cycles.
From a purely visual perspective, one notices that the SMX processor devotes a significantly larger amount of area to functional units, i.e., to computation, as compared to the CPU core. Because a CPU core executes 1 thread at a time, it needs lots of cache in order hold a lot of memory on chip in an effort to reduce the amount of times a piece of data must be retrieved from main memory. Basically, the CPU is much faster than main memory access, so any time a CPU needs data from memory, it has to stall and wait on the data to arrive. By keeping a lot of memory on chip, a CPU can (and often does) avoid these stalls. The SMX has very little cache. Instead, it takes the approach that since it designed to execute many threads, any thread that is stalled waiting on a memory request is scheduled out of the CPU, and another thread that is currently scheduled out can be put into the CPU and begin executing. Therefore, memory stalls are hidden because the threads that are waiting for memory access get to wait while other threads jump into the processor and execute. Note that this model assumes there lots of threads. Ideally, there are more threads than functional units available; really you want a number of threads that is a multiple of the number of functional units available.
| [1] | In reality, Cuda GPUs have a higher level grouping called Graphics Processing Clusters (GPCs) which contain multiple SMXs and some other units, such as a raster engine. However, in terms of general purpose computing on the GPU at the level covered in this document, we are mainly interested in the SMXs. |
Concept
In a GPU processor, threads that are stalled on memory requests are scheduled out of execution, and threads that are ready to execute are put into the functional units. Therefore. This approach to hiding memory stalls works best when there are more threads than functional units avaialable. In general, you want to have many more threads than functional units available.
Recall the OpenMP model of threading in which it is very easy to create a large number of threads. The GPU processor is an ideal candidate for this concept of creating many of threadsi (although we will not use OpenMP to do it since OpenMP is specific to CPUs. Check out OpenAcc for the OpenMP counterpart for the GPU).
Because many functional units are controlled by a single control unit, it organize threads into blocks such that each block can be sent to a group of functional units controlled by a single control unit. In essence, a block is just a group of threads that have identical code (so they can all do the same thing in the same clock cycle). Really, we will usually create a bunch of blocks that all do the same thing. A group of blocks will be sent to a SMX, and each block will then get dispatched to a group of functional units. In keeping with the idea of creating lots of threads, it is OK to send more blocks to an SMX than it has functional units to handle. The blocks will then get switched in and out of functional units to hide memory stalls.
- Block
- A group of threads that all contain the same code. Each thread will execute the same code (usually) on a different data element. Again, think about array elements.
- Thread
- A thread is a single thread of execution. Threads are organized into blocks.
Concept
To effectively use GPU hardware, we need an algorithm that can be designed to create many threads grouped into multiple blocks such that each thread contains identical code, but will execute on indepenent data.
Algorithms based on arrays and matrices tend to fit this extremely well.
Creating Algorithms that Divide Work into Many Threads
Section Goals:
- Identify portions of an algorithm that are good candidates for parallelization.
- Design algorithms with threads that take advantage of GPU architectures.
With any multi-threaded/parallel/distributed program to be successful, we need to design an algorithm with a few properties:
- The work must be be able to be divided into independent units that can be computed (mostly) individually.
- If threads need to communicate, the communication must be designed so that it occurs efficiently.
- If threads need to collaborate, the collaboration must be designed so that threads are not spending too much time waiting on values produced by other threads.
Communication and collaboration are similar. The difference tends to arise in distributed programming scenarios with lots of threads running on different machines. In such scenarios, one must consider network communication delays, proximity of servers on a network, etc. In such cases, communication and collaboration manifest separately. In your typical multithreaded application that runs on a single computer, they can often be treated as one concept. Similarly in the case of your typical GPU application.
Monte Carlo Algorithm to Approximate Pi
Lets take an example. One fun algorithm to play with is the Monte Carlo Algorithm for Approximating  . A Monte Carlo algorithm is essentially a statistical simulation that uses sequences of random numbers as data. In order to approximate
  , we will take advantage of some geometric constructs, and the generate a bunch of random data points.
The basic idea for this algorithm comes from the fact that the ration of the area of a circle with radius  to the area of a square with edge length
  is equal to
  :
:

The basic idea is that if we can compute the ration of the areas, lets call it  , then we just multiply it by 4 to get . So, how do we get the ratio?
One way to compute the ratio is to just count up the number of points that lie inside the circle, and divide it by the number of points that lie inside the square. However, there are an infinite number of points in both the circle and the square, and we must do this on a finite computer. So, lets do a Monte Carlo simulation. Our approach is to simply generate  random points inside the square, and count up the number of points that happen to fall only in the circle
  . The ration
  . An illustration of this approach is shown in Fig. 5
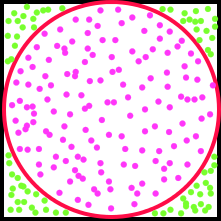
Fig. 5 An illustration of generating random points in a unit square with a circle inscribed in it.
We can also observe that we don’t necessarily need the entire square and circle, we can get the same ratio by just considering a single quadrant of the square (Fig. 6). This simplifies the code a bit.
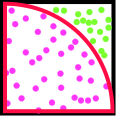
Fig. 6 Using just one quadrant of the square preserves the desired ratio, and ultimately makes the code more simple.
The algorithm to do this computation looks like the following:
var count = 0
Repeat X times:
    x = random value between 0 and 1
    y = random value between 0 and 1
    if x*x+y*y <= 1:
        count = count + 1
piApprox = 4 * (count/X)
The algorithm is rather simple. The next step is to just figure out the best way to assign work to threads. Clearly, the majority of the work occurs in the for loop. In fact, just about all the work occurs in the for loop. So, we should try to divide up that work. Notice that each iteration of the loop is rather independent. Each iteration simply gets some random values and does some calculations. Iterations do write to the same count variable, so they must be careful about race conditions, but this is the only problem. So, a natural division of work is that each thread will execute some number of loop iterations. The next question is: how many threads? Recall that the GPU is very good at creating lots of threads, and in fact, uses the fact that it is good at having lots of threads to hide memory latencies. So, lets say that we will create a bunch of threads. Each thread can then do some work, lets say 1000 iterations of the loop, and keep track of its own local copy of the count variable. At the end, we will have to sum all the local count variables into a single, final count value. At this point, we have not introduced many of the coding constructs needed to create a working Cuda program, but we go and show a Cuda implementation of the approximation algorithm. Some of the particulars are discussed below the algorithm, but this should give you a general idea of how a Cuda program will look:
1 2 3 4 5 6 7 8 9 10 11 12 13 14 15 16 17 18 19 20 21 22 23 24 25 26 27 28 29 30 31 32 33 34 35 36 37 38 39 40 41 42 43 44 45 46 47 48 49 50 51 52 53 54 55 56 57 58 59 60 61 62 63 64 65 66 67 68 69 70 71 72 73 74 75 76 77 78 79 80 81 82 83 84 85 86 87 88 89 90 91 92 93 94 95 96 97 98 99 100 101 102 103 104 105 106 107 108 109 110 111 112 113 114 115 | #include <sstream>
#include <iomanip>
#include <cuda.h>
#include <thrust/host_vector.h>
#include <thrust/device_vector.h>
#include <curand.h>
#include <curand_kernel.h>
#include <iostream>
using namespace std;
#define NUM_POINTS_PER_THREAD 1000
__global__ void kernel_initializeRand( curandState * randomGeneratorStateArray, unsigned long seed,
int totalNumThreads )
{
int id = (blockIdx.x * blockDim.x) + threadIdx.x;
if( id >= totalNumThreads ){
return;
}
curand_init ( seed, id, 0, &randomGeneratorStateArray[id] );
}
__global__ void kernel_generatePoints( curandState* globalState, int* counts, int totalNumThreads )
{
// calculate which thread is being executed
int index = (blockIdx.x * blockDim.x) + threadIdx.x;
// create vars
float x,y;
// make sure we don't go off the end of the counts array
if( index >= totalNumThreads ){
return;
}
// get the state for the random number generator
// of this thread
curandState localState = globalState[index];
// generate the points, see if they fall in the unit circle
for(int i = 0; i < NUM_POINTS_PER_THREAD; i++ )
{
x = curand_uniform( &localState );
y = curand_uniform( &localState );
if( x*x+y*y <= 1 )
counts[ index ] ++;
}
globalState[index] = localState;
}
int main( int argc, char** argv)
{
if( argc < 2 ){
std::cerr << "usage: " << argv[0] << " [number of threads to use] " << endl
<< "This program approximates pi using a Monte Carlo approximation and the "<<
<< "'square inside a circle' method." <<endl
<< "Each thread will generate 1000 points"<< endl;
exit(0);
}
int numThreads;
{
stringstream ss1( argv[1] );
ss1 >> numThreads;
}
// Step 1: Figure out how many thread blocks we need.
dim3 threadsPerBlock( 1024, 1, 1);
dim3 numberofBlocks( (numThreads + threadsPerBlock.x-1)/threadsPerBlock.x,1,1);
// Step 2: initialize the random number generator on the GPU. Each thread will be generating
// its own sequence of random numbers. The random number generator actually does not generate
// random numbers. Instead, it generates a sequence of numbers that behave as if they are random.
// Basically, if the random number generator is started at the same point in the sequence (and
// with the same SEED value) for multiple runs, it will generate the SAME sequence of numbers!
// Since each thread generates its OWN pseudorandom sequence, each thread needs to keep track of
// the STATE of its random number generator. Thus, we create a curandState struct for each thread
// that will be generating random numbers. When we make a call to the random numebr generator, we
// simply pass the state values to it. This is the standard way of allocating memory on the GPU
curandState* devRandomGeneratorStateArray;
cudaMalloc ( &devRandomGeneratorStateArray, numThreads*sizeof( curandState ) );
// Step 3: we need to create some vectors. This way uses the thrust libraries to
// allocate GPU memory and perform transfers from CPU to GPU memory.
// Its a little easier than the tradtional way.
// create a vector to hold the counts for each thread
thrust::host_vector<int> hostCounts(numThreads, 0);
// transfer that vector to the GPU
thrust::device_vector<int> deviceCounts( hostCounts );
// get a pointer to that vector so we can pass it to the kernel.
int* dcountsptr = thrust::raw_pointer_cast( &deviceCounts[0] );
// Step 4: Initialize the random number generator states. Again, each thread needs its own
// state. We will seed each of the states based on the current time.
// launch a bunch of copies of the kernel (1 for every thread)
kernel_initializeRand <<< numberofBlocks, threadsPerBlock >>> ( devRandomGeneratorStateArray,
time(NULL), numThreads );
// Step 5: Generate the points and get counts for how many fall in the unit circle
kernel_generatePoints <<< numberofBlocks, threadsPerBlock >>> ( devRandomGeneratorStateArray,
dcountsptr, numThreads );
// Step 6: Each thread generated its own count. We need to add them all up
// the easy way is to use a thrust reduction on our thrust vector
// this will occur on the GPU since we use the vector on the GPU
// we will perform a recution on the entire array, beginning with a sum value initialized to 0,
// and perform a `plus` operation. This will just add up all the numbers in the vector.
int sum = thrust::reduce(deviceCounts.begin(), deviceCounts.end(), 0, thrust::plus<int>());
std::cout << "Our approximation of pi =" <<std::setprecision(10)
<< (float(sum)/(numThreads*NUM_POINTS_PER_THREAD))*4 << std::endl;
return 0;
}
|
In Cuda terminology, a kernel is a function that will be run on a GPU. Our code has two kernels. The first simply initializes the states of the random number generators for each thread that will run (because we have to generate random points). The second is actually the body of the for loop in our algorithm. The __global__ keyword simply tells the compiler that the function can be called from code running on the CPU or from code running on the GPU.
Recall that we said we would generate a bunch of threads, and each thread would run through about 1,000 iterations. In the kernel_generatePoints kernel, there is a for loop that runs 1,000 times. Remember, the kernels are constructed so that a single thread executes a single kernel. Recall that in a group of functional units in a SMX, all functional units are executing the same code in the same clock cycle, but are working on different data. Therefore, A bunch of threads execute the same kernel (so they have the same code), and in this case, each thread generates its own random data.
Another issue to think about is the count variables. Remember, we said that each thread would have its own version of the count variable. Our approach in this code was to create a vector of integers such that each thread would only use 1 element in the vector as its own count variable. At the end, we have to sum all the counts for each individual vector into the total count.
Because each thread runs a single kernel, we must tell our program how many threads to create. The program takes a command line parameter that indicates the number of threads to create. Cuda will simply create as many threads as you tell it to; threads will automatically be numbered consecutively beginning with number 0. Cuda wants to group threads into blocks. A block just holds a group of threads, and the blocks are used for scheduling threads to groups of functional units in an SMX. On lines 68 and 69, we tell Cuda how many threads we want in a block, and then we compute how many blocks we will need based on the input parameter that user specifies to indicate the number of threads to create. This information is used at the kernel launch calls on lines 98 and 102 to tell Cuda how many kernels will be launched (1 kernel per thread). Typically, the first item of business in a kernel is to determine the thread’s ID number (lines 18 and 28). All of this will be explained in more detail later.
Again, remember that we have to allocate memory both on the GPU and on the CPU. The GPU works on items in GPU memory, so that data must explicitly be allocated. In our code, we use two mechanisms. The first is the traditional Cuda way of allocating memory, using cudamalloc(). Lines 80 and 81 allocate some memory to hold the random number generator states for each thread that will be launched. The second mechanism is to allocate vectors using the thrust library. Thrust is the equivalent of the standard template library for Cuda. It allows much more concise syntax for allocating GPU memory and transferring data between the GPU and CPU.
We can run the program multiple times and see that the approximation changes slightly, but does a pretty good job. Also, you can play with the number of threads launched to see its effect on accuracy and run time.
$ nvcc -arch=sm_20 piGen.cu -o pigen

$ ./pigen 20
Our approximation of pi =3.130199909

$ ./pigen 200
Our approximation of pi =3.139499903

$ ./pigen 2000
Our approximation of pi =3.143307924

$ ./pigen 20000
Our approximation of pi =3.141334295

$ ./pigen 200000
Our approximation of pi =3.141306162

$ ./pigen 2000000
Our approximation of pi =3.141551018
As the number of generated points becomes larger, the accuracy of the approximation tends to improve. Note that in the last run we used  threads, each running
  iterations. That is
  points! Its a lot of points.
Excercise
Create a file containing the program above. Get it to compile, and run it with different amounts of threads to get a feel for its performance. Try a few things like altering the number of iterations in a single kernel call. Try changing the number of threads per block.
Note
Notice the vast majority of the code in the above example is simply setting up memory and kernel calls. The actual work (done in the for loop in the kernel) is only about 5 lines of code.
Dividing Work Among Cuda Threads
Section Goals:
- Design algorithms with threads that take advantage of GPU architectures.
- Explain the concept of thread divergence.
- Explain the aspects of thread communication that are unique to the GPU.
As we saw in the last example, one key to effectively programming any parallel system is to divide the work well. However, we need to keep a couple of things in mind with the GPU.
Dividing the Work
Often, GPU kernels tend to be rather short in terms of lines of code. As kernels grow in complexity, it becomes more difficult to ensure that you will achieve maximum performance. There are a few reasons for this. One is that each kernel has a limited amount of registers that can be allocated to it in hardware. If this number is exceeded, the program will crash. Another is that you don’t want to have a situation where 1 thread in a block has a lot of work to do, and the others are finished. The GPU gets its power from massive parallelism. Any the amount of work among threads in a block is unbalanced, you will see sub-optimal performance.
Concept
Kernels tend to be rather short and to the point. One wants to ensure the amount of work being done by threads in a block is roughly equal.
Branch Diversion
Some kernels contain if statements. By definition, an if statement forces the thread of execution to either skip over a code block, or execute it. One cannot expect that ALL threads in a block will ALWAYS follow the same thread of execution through if statements. For example, in lines 45 and 46 in the example above, some threads will create a random point that falls in the circle, and others will not. Recall that all threads executing in a group of functional units must execute the same instruction in the same clock cycle. So, what happens on lines 46 and 47?
When two threads executing in a group of functional units do encounter a situation where one thread enters the block controlled by the if` statement, and the other does not, we say the threads have diverged. Basically, the thread for which the if statement evaluated to False must simply wait until the other thread executes the code block controlled by the if statement. This means that one thread stalls while the other executes. This is called thread divergence
Thread divergence can occur when conditional statements and loops exist in kernels. Remember, any time thread divergence occurs, some threads must simply stall and burn clock cycles. If all threads in a block follow the same path of execution in a kernel, then no thread divergence, and thus no stalls, occur. This is another reason why kernels tend to be short and simple.
Thread Communication
Sometimes individual threads must communicate. This typically occurs through shared memory, but GPUs have the problem that very large numbers of threads are often created. This situation means that just acquiring locks on memory addresses may often lead to sub-optimal performance.
The rules of shared memory in Cuda are rather intuitive. Any variables declared within a kernel are local in scope to that kernel, and each individual thread will have its own, private memory location to store that data. Any pointers to memory passed in to a kernel as an argument points to a memory location that was allocated outside the scope of the kernel, and thus, all threads will have a pointer to that one, shared location in memory.
If threads must write to a shared global memory address, they often do it through atomic operations, such as atomicAdd. The atomic operators guarantee that race conditions will not occur, but often at the cost of speed.
In our example above, each thread had its own copy of count. Our approach was to create a vector in global memory that all threads could access, but only allow each thread to access 1 array element. That way, all threads wrote to independent memory locations, and race conditions were not a problem. The only problem was at the end, we had an array of counts for each thread, and not a total. So, we had to do one more step and sum the contents of the array. The practice of reducing an array of values down to a single value is called a reduction. Luckily, the Thrust library provides many common reductions, such as sum, max, min, etc., and we just used that.
Concept
A ruduction occurs when you take an array of values, and perform some operation on it to reduce it to a singel value (or sometimes, a smaller set of values). Common examples are:
- Compute the sum of an integer array.
- Find the maximum value in an array.
- Find the minimum value in an array.
Because communicating through shared memory is often problematic in a GPU because of the large numbers of threads, reductions are very common. This is another reason why kernels tend to be short and simple. Instead of one big kernel performing an entire algorithm, algorithms are often broken into smaller pieces so that reductions or other data transformations can occur between steps in the algorithm.
An Example: Sum3
Section Goals:
- Describe the concepts of grid, grid dimensions, blocks, and threads and how they relate.
- Use error checking on the GPU.
The program to approximate gives a brief example of a Cuda program to give the reader a general idea of the structure of a Cuda program and the issues that tend to arise. In this section, we develop a Cuda program incrementally to explain all the details. We will continue the example of the Sum3 problem.
Recall that the Sum3 problem takes an array, and returns the number of triples in that array that sum to the value  . The following example illustrates:
Example
The result of computing the Sum3 algorithm on the following list of numbers is 2:

Since:


Again, the simplest way to compute the result is to use a double nested for loop to simply generate all possible triples and test them. Clearly, this solution has a time complexity of  . For example:
1 2 3 4 5 6 7 8 9 10 11 12 13 14 15 16 17 18 19 20 21 22 23 | #include <iostream>
using namespace std;
int main( )
{
int dataSize = 5;
int* data = new int[ dataSize ];
data[0] = -1;
data[1] = -2;
data[2] = 0;
data[3] = 2;
data[4] = 3;
// do the naive Sum3 computation. O(n^3)
int count = 0;
for (int i = 0; i < dataSize-2; i++)
for (int j = i+1; j < dataSize-1; j++)
for (int k = j+1; k < dataSize; k++)
if (data[i] + data[j] + data[k] == 0)
count++;
cout<< count <<endl;
}
|
So, lets break this down into a simple Cuda program.
Step 1: Divide the Work Among Threads
The first step is to figure out how much work each thread will do. We will use our knowledge of the GPU architecture to pick an amount of work that is relatively manageable and straightforward in an attempt to reduce thread divergence and unnecessary complexity. Once the program works, we will worry about increasing the complexity to achieve higher performance.
In the basic CPU version of the program, the purpose of the loops is to simply generate a triple of values from the array. Remember, the GPU is very good at handling large numbers of threads. So, one way to go about this is to generate a single thread for every triple that must be generated. Each thread just tests to see if its triple sums to 0. However, that is probably a little bit of overkill in terms of thread creation since this it will generate threads. Instead, lets have each thread do a bit more work. Lets have each thread contain a single for loop: thus, a thread will be generated with 2 values of a triple fixed, and it will generate all possible triples that contain those two fixed values:
Example
If we want each thread to have 2 fixed values, then for the situation depicted in the previous exmaple code that uses the following array:
We will generate threads that do the folllowing:
| Thread | Fixed values | Triples tested in the thread |
|---|---|---|
| 1 | -1, -2 | (-1,-2,0), (-1,-2,2), (-1,-2,3) |
| 2 | -1, 0 | (-1, 0,2), (-1, 0,3) |
| 3 | -1, 2 | (-1, 2,3) |
| 4 | -2, 0 | (-2, 0,2), (-2, 0,3) |
| 5 | -2, 2 | (-2, 2,3) |
| 6 | 0, 2 | ( 0, 2,3) |
Therefore, we need a kernel that has two fixed array indexes, and loops over the array for the third. Cuda provides a mechanism by which we can assign identifiers to threads. The basic idea is that thread numbers start at 0, and increment up to the number of threads we wish to generate. This makes it very easy to assign a particular array location to a particular thread for computation. Furthermore, we can structure these thread IDs so that they are 2 or 3 dimensional so that they correspond to 2D array (matrix) locations or 3D array (matrix) locations. Cuda supplies some special, built-in variables that allow us to access the ID of a particular in a kernel. Remember, many threads execute the same kernel, but with different thread IDs, allowing us to easily assign different array locations to be processed by different threads.
The special built in variables that provide access to a thread’s ID are:
- threadIdx
- A struct containing 3 integers: threadIdx.x, threadIdx.y, and threadIdx.z
- blockIdx
- A struct containing 3 integers: blockIdx.x, blockIdx.y, and blockIdx.z
- blockDim
- A struct containing 3 integers: blockDim.x, blockDim.y, and blockDim.z
Instead of simply numbering threads from 0 up to the total number of threads, threads are divided into blocks. Each block begins numbering threads at 0. To get the threads actual number (as if the numbers just incremented across the entire range of threads), you must add the threadIdx value to the blockIdx * blockDim values. The following example depicts this concept visually
Example
Assume we have a 2D array (a matrix) with 10 rows and 11 columns. We want to create kernel threads such that each thread access a single cell in the matrix. The most straightforward to do this is for each thread to have an ID that corresponds to a matrix cell. So, we will create threads with 2-dimensional IDs (a row and column value).
We must also break the threads up into blocks. A Cuda block can hold up to 1024 threads (typically), wich can hold all of our threads in this case. For the purposes of exposition, howeve, we will specify blocks to contain 3 threads in the  dimension and 4 threads in the
  dimension.
Note that matrices use [row][column] addressing and cuda uses [X][Y] addressing. Therefore:


Thus, we can visually represent the thread IDs as follows:

Each matrix cell is labeled with its threadIdx values in blue, the actual matrix cell numbers in red. To compute the matix cell numbers, we need to know the block containing the thread, and the dimension of the blocks. In our example, we have:
blockDim.x=3
blockDim.y=4
So, the thread associated with matrix cell 7,6 (row 7, column 6), we have the following:
threadIdx.x = 0 (column)
threadIdx.y = 3 (row)
blockIdx.x = 2 (column)
blockIdx.y = 1 (row)
Cell address = ((blockIdx.y * blockDim.y)+threadIdx.y, (blockIdx.x * blockDim.x) + threadIdx.x) = (row, column)
Cell address = (7,6)
Note
Note that this example equated the X values with columns and the Y values with rows. You can switch this if you like, just make sure to carry the switch through all the calculations.
Warning
Notice that the blocks extend past the end of the array. Threads WILL be created with IDs for these areas, and they will be accessing memory out of the array bounds. In each individual kernel, you must check to make sure the threadID corresponds to a matrix cell that is IN ARRAY BOUNDS! If not, your program will probalby crash.
If a Cuda program crashes within a kernel, it can be difficult to debug. A good rule of thumb is to first make sure you are not exceeding array bounds.
Now that we can determine thread IDs, we can construct a simple kernel. Remember, each thread will have 2 values fixed, and iterate over all remaining possibilities to form triples. The following code accomplishes this:
1 2 3 4 5 6 7 8 9 10 11 12 13 14 15 16 17 | __global__ void sum3Kernel( int* device_nums, int arraySize, int* count )
{
const int aIndex = threadIdx.x + (blockDim.x * blockIdx.x);
const int bIndex = threadIdx.y + (blockDim.y * blockIdx.y);
const int size = arraySize;
if( aIndex < size-2 && bIndex < size-1 && bIndex > aIndex )
{
for( int i = bIndex+1; i < size; i++ )
{
if( device_nums[aIndex] + device_nums[bIndex] + device_nums[i ] == 0 )
{
atomicAdd( count, 1 );
}
}
}
}
|
The __global__ keyword indicates that the kernel can be called from code executing on both the CPU and GPU. The function takes 3 variables:
- device_nums: An array of integers that we are computing the Sum3 algorithm upon.
- arraySize: The length of the array device_nums.
- count: A pointer to an integer allocated in GPU memory. Each time we find a triple that sums to 0, we will increment the count.
Lines 3 and 4 use the thread and block IDs to identify a pair of numbers in the device_nums array. We assume we will launch threads with 2 dimensional IDs. Each ID will form the index of a number in the device_nums array. The kernel will then form all possible triples with numbers from device_nums that use those two indexes.
Line 7 just makes sure that we are staying in the array bounds, and that we are not creating duplicate triples.
The loop on line 9 iterates over the appropriate values in the array to form triples.
Line 11 tests a triple to see if it sums to 0.
Line 13 increments the count variable. Since we may have a very large number of threads, and all threads are going to access the same location in GPU memory, a raw memory access will have race conditions. To get around this, we use an atomic function. The atomic function ensures that the increments to count will happen as if the program was a serial program (i.e., no race conditions will occur). This can negatively affect performance. In our case, not very many triples will end up summing to 0, so it shouldn’t affect performance too much.
At this point, we have a kernel that will divide up work among the threads in a reasonable fashion. The rest of program is just setting up memory, and launching the right number of threads!
Step 2: Setting up GPU Memory
Our kernel takes three arguments. One is the arraySize integer. By inspecting the function, you should see that is a pass by value argument, meaning that the actual integer will copied into a variable in the local scope of the function. This is achieved in the normal way of using a pass by value variable in a function call. The other two arguments are pointers to memory addresses. Because the kernel is run on the GPU, these pointers MUST point to allocated memory on the GPU. So, we must allocate that memory.
The process to allocate memory on the GPU is the same as on the CPU. We simply use a memory allocation function to allocate the memory, then we initialize it. The only difference is that we use allocation functions provided by Cuda. Also, we can either initialize the memory using a kernel, or we can just copy data into the allocated memory from CPU memory. So, the usual recipe goes as follows:
- Allocate memory on the CPU
- Initialize the memory using code run on the CPU
- Allocate an identical memory structure on the GPU
- Copy the initialized memory from the CPU to the GPU
Again, we must simply use Cuda provided functions to do the GPU stuff. Here is the code to intialize the device_nums array and the count integer:
1 2 3 4 5 6 7 8 9 10 11 12 13 14 15 16 17 18 19 20 21 22 23 24 25 26 27 28 29 | // Create an array of numbers in traditional memory.
// Fill the array with random values
std::vector<int> data;
srand(0);
for( int i = 0; i < total; i++ )
{
int tmp = myRandInt( ); // retuns a random integer between -100 and 100
data.push_back( tmp );
}
// Step 1: Create an array on the GPU to hold the numbers that we
// will do the sum3 computation on
int *device_nums;
cudaMalloc( &device_nums, data.size() * sizeof( int) );
// Step 2: Copy the data to the device array
cudaMemcpy(device_nums, &(data[0]), data.size() * sizeof( int), cudaMemcpyHostToDevice);
//Step 3: We must keep track of the number of triples that sum
// to 0. We will create a single memory location (variable) on
// the GPU that is SHARED among ALL threads. Whenever a thread
// finds a triple that sums to 0, this variable will be incremented
int* device_count;
cudaMalloc( &device_count, sizeof( int) );
{
// initialize the count to 0
int startCount = 0;
cudaMemcpy(device_count, &(startCount), sizeof( int), cudaMemcpyHostToDevice);
}
|
In the above code, the array is allocated first. Line 3 creates a vector that is then initialized with random numbers in lines 5-9.
To create the GPU memory, we first need a pointer to record the address of the memory we allocate (line 13). The GPU memory allocation function is cudaMalloc (line 14). We pass the pointer to hold the address of the allocated memory, and size of the chunk of memory we want to be allocated.
To copy data to the GPU, we simply use cudaMemcpy (line 17). It takes a pointer to the GPU memory, a pointe to the CPU memory to be copied, and the size of the chunk of memory to be copied. Finally, we pass a constant cudaMemcpyHostToDevice. This just is just a check to ensure that we are copying data form the host (CPU) to the device (GPU). Really, this just makes the code easier to read.
The count variable is allocated and initialized in exactly the same way (lines 23-29). The only difference is that a single integer is allocated instead of an array of integers.
Note
Only 1 integer is created and called count. This means ALL threads executing the kernel above access the SAME memory location. This is why the atomic function is required to avoid race conditions.
Step 3: Launching the Threads
Now that we have set up the kernel, allocated the memory, and intialized the memory, it is time to launch the threads. Recall that the kernel expects threads to be numbered with a 2-dimensional numbering scheme. In order to to this, we first have to decide how many threads we want in each block. Based on that concept, we can then do some arithmetic to determine how many blocks are required to generate threads over our entire data set. Cuda provides a struct with 3 integers that allow us to specify X, Y, and Z values for the numbers of threads per block and the number of blocks. It is called dim3.
So, to record the number of threads per block we want, we simply create and initialize a dim3 struct. To indicate the number of blocks to create, we simply divide the threads per block into the array size along each dimension.
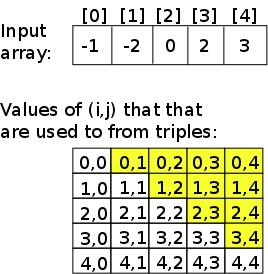
Fig. 7 A depiction of the values of  and
and  that must be used to form triples for testing in the sum3 problem. The shaded cells are the values of and that must be used.
Remember, we want each thread to have a 2-dimensional ID, so we create threads in 2-dimensions. The thread IDs will index two spots in the array. Note that (take a look at the CPU code above), the thread IDs that we need only form an upper-triangular matrix of valid IDs (i=0, j=i+1, etc). This means about half of our threads won’t actually do anything. But, thats OK! although not optimal. Fig. 7 shows the values of and that must be used to form triples. Clearly, we generate a lot of threads that do nothing. The good thing is, these threads will launch, run for a couple clock cycles (basically just compute their IDs and hit the if statement), and then be done. Overall, it is not a big deal in this case.
The code below has the code to assign the number of threads per block and the number of blocks to create based on array size. The kernel launch has a funny <<< >>> syntax. This is used to tell Cuda how many threads to launch, and how to arrange them into blocks:
dim3 threadsPerBlock(16,32);
dim3 numBlocks((data.size() +threadsPerBlock.x-1)/ threadsPerBlock.x,
sum3Kernel<<< numBlocks, threadsPerBlock>>> ( device_nums, data.size(), device_count );
Many GPUs have a max block size of 1024 threads. Check the documentation of your GPU to be sure. Here, we use a smaller block size. Try playing around with block sizes to see how they affect performance.
Step 4: Transfer the result back to GPU memory
The final step is to simply transfer the vlaue of count from the GPU back to the CPU so we can print it out. This occurs with a cudaMemcpy just like transferring data to the GPU. The code is below:
int totalFound;
cudaMemcpy(&totalFound, device_count, sizeof( int), cudaMemcpyDeviceToHost);
All Together Now
The complete code is shown below.
1 2 3 4 5 6 7 8 9 10 11 12 13 14 15 16 17 18 19 20 21 22 23 24 25 26 27 28 29 30 31 32 33 34 35 36 37 38 39 40 41 42 43 44 45 46 47 48 49 50 51 52 53 54 55 56 57 58 59 60 61 62 63 64 65 66 67 68 69 70 71 72 73 74 75 76 77 78 79 80 81 82 83 84 85 86 87 88 89 90 91 92 93 94 95 96 97 98 99 100 101 102 103 104 105 106 107 108 109 110 111 112 113 114 115 116 117 118 119 120 121 122 123 124 125 126 127 128 129 130 131 132 133 134 135 136 137 138 139 140 141 142 143 144 145 146 147 148 149 | #include <iostream>
#include <sstream>
#include <fstream>
#include <vector>
#include <string>
/*****************************************************
**********************
This file is a cuda implementation of the sum3 program.
It takes an array of numbers, and counts how many triples
in the array sum to 0. To do this, the program creates
a 3 dimensional array of computations such that each cell
in the array represents the computation of the sum of 3 numbers
in the array. There are errors in that duplicates are not accounted for,
but the code works.
**********************
******************************************************/
__global__ void sum3Kernel( int* device_nums, int arraySize, int* count )
{
    const int aIndex = threadIdx.x + (blockDim.x * blockIdx.x);
    const int bIndex = threadIdx.y + (blockDim.y * blockIdx.y);
    const int size = arraySize;

    if( aIndex < size-2 && bIndex < size-1 && bIndex > aIndex )
    {
        for( int i = bIndex+1; i < size; i++ )
        {
            if( device_nums[aIndex] + device_nums[bIndex] + device_nums[i ] == 0 )
            {
                atomicAdd( count, 1 );
            }
        }
    }
}
int myRandInt()
{
int num = rand() % 100 +1;
if( rand( ) % 2 == 0 )
num *= -1;
return num;
}
int main( int argc, char * argv[] )
{
int total = 4;
if( argc != 2 )
{
std::cerr << "usage: exe [num of integers to generate for the sum3 computation]" << std::endl;
exit( -1 );
}
{
std::stringstream ss1;
ss1 << argv[1];
ss1 >> total;
}
// Create an array of numbers in traditional memory.
// Fill the array with random values
std::vector<int> data;
srand(0);
for( int i = 0; i < total; i++ )
{
int tmp = myRandInt( );
data.push_back( tmp );
}
// Step 1: Create an array on the GPU to hold the numbers that we
// will do the sum3 computation on
int *device_nums;
cudaMalloc( &device_nums, data.size() * sizeof( int) );
// Step 2: Copy the data to the device array
cudaMemcpy(device_nums, &(data[0]), data.size() * sizeof( int), cudaMemcpyHostToDevice);
//Step 3: We must keep track of the number of triples that sum
// to 0. We will create a single memory location (variable) on
// the GPU that is SHARED among ALL threads. Whenever a thread
// finds a triple that sums to 0, this variable will be incremented
int* device_count;
cudaMalloc( &device_count, sizeof( int) );
{
// initialize the count to 0
int startCount = 0;
cudaMemcpy(device_count, &(startCount), sizeof( int), cudaMemcpyHostToDevice);
}
// Just some code to time the kernel
cudaEvent_t startTotal, stopTotal;
float timeTotal;
cudaEventCreate(&startTotal);
cudaEventCreate(&stopTotal);
cudaEventRecord( startTotal, 0 );
// Step 4: Decide how many threads we will organize into a block. The
// number of threads required will depend on the length of the array
// containing random numbers. Here, we are simply figuring out
// how many threads we need based on the size of that array
// (we allocated the array as an STL vector)
//
// Since EACH thread gets 2 fixed values, we are going to give threads
// ID numbers that will indicate the array indexes of the 3 values
// that will be fixed in that thread. So, we create a 2 dimensional
// thread block. It simply labels each thread with 2 numbers that form
// its identifier.
dim3 threadsPerBlock(16,32);
dim3 numBlocks((data.size() +threadsPerBlock.x-1)/ threadsPerBlock.x,
(data.size() +threadsPerBlock.y-1)/ threadsPerBlock.y);
std::cerr <<"data size: " <<(data.size()) << std::endl;
std::cerr <<"block sizes: " <<(data.size() +threadsPerBlock.x-1)/ threadsPerBlock.x
<<", " <<(data.size() +threadsPerBlock.y-1)/ threadsPerBlock.y << std::endl;
// Step 5. Now we have computed how many threads to launch. We have
// given each thread and identifier consisting of a pair (x,y).
// Finally, launch the threads.
sum3Kernel<<< numBlocks, threadsPerBlock>>> ( device_nums, data.size(), device_count );
// Step 6: After the threads have all finished, the count of triples that
// sum to 0 is still stored on the GPU. We just need to transfer it
// back to the CPU so we can print it out.
int totalFound;
cudaMemcpy(&totalFound, device_count, sizeof( int), cudaMemcpyDeviceToHost);
// stop the timer
cudaEventRecord( stopTotal, 0 );
cudaEventSynchronize( stopTotal );
cudaEventElapsedTime( &timeTotal, startTotal, stopTotal );
cudaEventDestroy( startTotal );
cudaEventDestroy( stopTotal );
// print it out!
std::cerr << "total time in seconds: " << timeTotal / 1000.0 << std::endl;
std::cerr << "Total triples found: " << totalFound <<std::endl;
}
|
Exercise
Compile and run the sum3 Cuda program. See how long it takes to run on various inputs. Try different block sizes. Compile the CPU version of the code and compare running times.
Cuda Error Checking
One thing to remember is that the kernels are running on the GPU, which impacts how errors are reported. If you remember the first time you had a seg fault using C code, you may recall that it was initially baffling. The program crashed and really gave you no clues as to where in the code the error occurred. The nice thing about seg faults is that you can usually find out rather easily that the crash was indeed a seg fault. If you have a memory error on the GPU, it is even harder to tell what is going on. Basically, the program will continue to run, in many cases, but the GPU your GPU computations just won’t work. If you are lucky, you will get some kind of message indicating that something went wrong.
When an error does occur on the GPU, error flags are set; one must simply check to see if any error flags are set after making a Cuda call. The following version of the code is identical to the code above, but has some macros and functions that will check the error flags on the GPU and halt the program if one is set. The code has been floating around the Internet for a while, and originated in the examples that come with the Cuda SDK. Here is the full Sum3 code with the error checking code. Do note that there is a comment about one of the error checking calls affecting performance (lines 60-68). If you are timing your code, you might want to comment that line out, or just turn off error checking by commenting out the #define CUDA_CHECK_ERROR line (line 29).
1 2 3 4 5 6 7 8 9 10 11 12 13 14 15 16 17 18 19 20 21 22 23 24 25 26 27 28 29 30 31 32 33 34 35 36 37 38 39 40 41 42 43 44 45 46 47 48 49 50 51 52 53 54 55 56 57 58 59 60 61 62 63 64 65 66 67 68 69 70 71 72 73 74 75 76 77 78 79 80 81 82 83 84 85 86 87 88 89 90 91 92 93 94 95 96 97 98 99 100 101 102 103 104 105 106 107 108 109 110 111 112 113 114 115 116 117 118 119 120 121 122 123 124 125 126 127 128 129 130 131 132 133 134 135 136 137 138 139 140 141 142 143 144 145 146 147 148 149 150 151 152 153 154 155 156 157 158 159 160 161 162 163 164 165 166 167 168 169 170 171 172 173 174 175 176 177 178 179 180 181 182 183 184 185 186 187 188 189 190 191 192 193 194 195 196 197 198 199 200 201 202 203 204 | #include <iostream>
#include <sstream>
#include <fstream>
#include <vector>
#include <string>
/*****************************************************
**********************
This file is a cuda implementation of the sum3 program.
It takes an array of numbers, and counts how many triples
in the array sum to 0. To do this, the program creates
a 3 dimensional array of computations such that each cell
in the array represents the computation of the sum of 3 numbers
in the array. There are errors in that duplicates are not accounted for,
but the code works.
Note the usage of CudaSafeCall() and CudaCheckError(). You should use these
becuase cuda does not always fail in an obvious way without these functions.
Once things are working, you can remove these functions to speed things up a bit.
**********************
******************************************************/
///////////////error checking stufff
// Enable this for error checking
#define CUDA_CHECK_ERROR
#define CudaSafeCall( err ) __cudaSafeCall( err, __FILE__, __LINE__ )
#define CudaCheckError() __cudaCheckError( __FILE__, __LINE__ )
inline void __cudaSafeCall( cudaError err, const char *file, const int line )
{
#ifdef CUDA_CHECK_ERROR
if ( cudaSuccess != err )
{
fprintf( stderr, "cudaSafeCall() failed at %s:%i : %s\n",
file, line, cudaGetErrorString( err ) );
exit( -1 );
}
#endif // CUDA_CHECK_ERROR
return;
}
inline void __cudaCheckError( const char *file, const int line )
{
#ifdef CUDA_CHECK_ERROR
cudaError_t err = cudaGetLastError();
if ( cudaSuccess != err )
{
fprintf( stderr, "cudaCheckError() failed at %s:%i : %s.\n",
file, line, cudaGetErrorString( err ) );
exit( -1 );
}
// More careful checking. However, this will affect performance.
// Comment if not needed.
err = cudaDeviceSynchronize();
if( cudaSuccess != err )
{
fprintf( stderr, "cudaCheckError() with sync failed at %s:%i : %s.\n",
file, line, cudaGetErrorString( err ) );
exit( -1 );
}
#endif // CUDA_CHECK_ERROR
return;
}
/////////////////end of error checking stuff
__global__ void sum3Kernel( int* device_nums, int arraySize, int* count )
{
const int aIndex = threadIdx.x + (blockDim.x * blockIdx.x);
const int bIndex = threadIdx.y + (blockDim.y * blockIdx.y);
const int size = arraySize;
if( aIndex < size-2 && bIndex < size-1 && bIndex > aIndex )
{
for( int i = bIndex+1; i < size; i++ )
{
if( device_nums[aIndex] + device_nums[bIndex] + device_nums[i ] == 0 )
{
atomicAdd( count, 1 );
}
}
}
}
int myRandInt()
{
int num = rand() % 100 +1;
if( rand( ) % 2 == 0 )
num *= -1;
return num;
}
int main( int argc, char * argv[] )
{
int total = 4;
if( argc != 2 )
{
std::cerr << "usage: exe [num of integers to generate for the sum3 computation]" << std::endl;
exit( -1 );
}
{
std::stringstream ss1;
ss1 << argv[1];
ss1 >> total;
}
// Create an array of numbers in traditional memory.
// Fill the array with random values
std::vector<int> data;
srand(0);
for( int i = 0; i < total; i++ )
{
int tmp = myRandInt( );
data.push_back( tmp );
}
// Step 1: Create an array on the GPU to hold the numbers that we
// will do the sum3 computation on
int *device_nums;
CudaSafeCall( cudaMalloc( &device_nums, data.size() * sizeof( int) ) );
// Step 2: Copy the data to the device array
cudaMemcpy(device_nums, &(data[0]), data.size() * sizeof( int), cudaMemcpyHostToDevice);
CudaCheckError();
//Step 3: We must keep track of the number of triples that sum
// to 0. We will create a single memory location (variable) on
// the GPU that is SHARED among ALL threads. Whenever a thread
// finds a triple that sums to 0, this variable will be incremented
int* device_count;
CudaSafeCall( cudaMalloc( &device_count, sizeof( int) ) );
{
// initialize the count to 0
int startCount = 0;
cudaMemcpy(device_count, &(startCount), sizeof( int), cudaMemcpyHostToDevice);
CudaCheckError();
}
// Just some code to time the kernel
cudaEvent_t startTotal, stopTotal;
float timeTotal;
cudaEventCreate(&startTotal);
cudaEventCreate(&stopTotal);
cudaEventRecord( startTotal, 0 );
// Step 4: Decide how many threads we will organize into a block. The
// number of threads required will depend on the length of the array
// containing random numbers. Here, we are simply figuring out
// how many threads we need based on the size of that array
// (we allocated the array as an STL vector)
//
// Since EACH thread gets 2 fixed values, we are going to give threads
// ID numbers that will indicate the array indexes of the 3 values
// that will be fixed in that thread. So, we create a 2 dimensional
// thread block. It simply labels each thread with 2 numbers that form
// its identifier.
dim3 threadsPerBlock(16,32);
dim3 numBlocks((data.size() +threadsPerBlock.x-1)/ threadsPerBlock.x,
(data.size() +threadsPerBlock.y-1)/ threadsPerBlock.y);
std::cerr <<"data size: " <<(data.size()) << std::endl;
std::cerr <<"block sizes: " <<(data.size() +threadsPerBlock.x-1)/ threadsPerBlock.x
<<", " <<(data.size() +threadsPerBlock.y-1)/ threadsPerBlock.y << std::endl;
// Step 5. Now we have computed how many threads to launch. We have
// given each thread and identifier consisting of a pair (x,y).
// Finally, launch the threads.
sum3Kernel<<< numBlocks, threadsPerBlock>>> ( device_nums, data.size(), device_count );
CudaCheckError();
// Step 6: After the threads have all finished, the count of triples that
// sum to 0 is still stored on the GPU. We just need to transfer it
// back to the CPU so we can print it out.
int totalFound;
cudaMemcpy(&totalFound, device_count, sizeof( int), cudaMemcpyDeviceToHost);
// stop the timer
cudaEventRecord( stopTotal, 0 );
cudaEventSynchronize( stopTotal );
cudaEventElapsedTime( &timeTotal, startTotal, stopTotal );
cudaEventDestroy( startTotal );
cudaEventDestroy( stopTotal );
// print it out!
std::cerr << "total time in seconds: " << timeTotal / 1000.0 << std::endl;
std::cerr << "Total triples found: " << totalFound <<std::endl;
}
|
Performance
Now that we have the full example, we can see how they perform. The following table lists the execution times of the CPU version of the program without compiler optimizations, the CPU version with -O3 compiler optimizations, and the GPU version of the code. The time reported is the time for only the computation portion of the code, not setting up the arrays and generating random numbers. The CPU is an Intel Xeon. The GPU is a Tesla K40.
| Array size | CPU | CPU -O3 | GPU |
|---|---|---|---|
| 800 | 1.05393 | 0.1131 | 0.0047007 |
| 1000 | 2.05775 | 0.219797 | 0.00916141 |
| 1200 | 3.55459 | 0.378601 | 0.015605 |
| 1400 | 5.64653 | 0.600016 | 0.024847 |
| 1600 | 8.42537 | 0.893907 | 0.0369319 |
| 1800 | 12.0064 | 1.27085 | 0.0521852 |
| 2000 | 16.4582 | 1.74128 | 0.0722541 |
The GPU gets a speedup of 227 times over the non-optimized CPU code, and a speedup of 24 times over the compiler optimize CPU code. Thats pretty good. Now, we need to make the GPU code even faster!
Optimizing
Section Goals:
- Describe the memory hierarchy of the GPU.
- Use shared memory to optimize kernel.
At this point, we have a working Sum3 program that uses the GPU, and it is pretty fast. The last bit is just to optimize. We are following the usual path of getting something working first, then worrying about optimizations. This is usually a good plan to follow, since debugging a non-optimized implementation tends to be much easier.
When it comes to optimizing Cuda programs, one tends to focus on two venues:
- Reducing thread divergence.
- Optimizing memory access.
Memory optimizations, in particular, can lead to an order of magnitude improvement in performance!
Reducing Thread Divergence
The case for reducing thread divergence is obvious. If two threads in a block diverge, one must simply stall. So, its best to try to arrange our blocks such that threads within a block don’t diverge, or at least minimize divergence. Blocks are used a unit of grouping threads into groups of functional units on SMX cores.
Optimizing Memory: Global Memory Accesses
Optimizing memory access is the other major focus. This tends to follow two avenues, the first is optimizing global memroy accesses.
Global Memory
Global Memory is just the term for main memory on the GPU. When you use cudaMalloc, you are allocating memory in the GPU’s global memory.
Remember, the GPU is running many threads at once. Thus, in any clock cycle, many memory requests can be issued at once. GPU memory is highly banked, and these memory requests are handled most efficiently when threads are requesting memory stored in different memory banks. That way, each bank can find the requested memory in parallel.
In the GPU, memory tends to be allocated in arrays. One simple practice that a programmer can do to encourage efficient global memory access is to structure the block dimensions so that groups of threads that need to fetch the same piece of memory are grouped into the same block! Thus, block dimensions can have a big impact on memory access performance! If multiple threads need the same piece of memory, and all generate a memory request in the same clock cycle, then the GPU memory system only needs to handle 1 memory access. In essence, those memory accesses are coalesced into a single memory operation.
Another simple practice it to arrange data in multiple arrays, rather than an array of structs. For example, consider a program that is computing values based on points consisting of an  coordinate. The traditional way to manage this memory is to put the
  values into a struct, then create an array of structs. However, if a thread needs to get both and from memory for a particular point, they may be in the same memory bank, requiring 2 memory requests to the same bank that must be serialized. This is an overly simplistic example, but it gets the idea across. If instead, the programmer creates two parallel arrays, one containing values and the other containing values, then and will be stored far apart in memory, and will likely be stored on different memory banks.
Performance
The following table depicts the running times of the C, optimized C, Cuda, and shared memory Cuda versions of the sum3 program (in seconds). The shared memory version of the program runs in about half the time of the first GPU program:
| Array Size | CPU | CPU -O3 | GPU | GPU Shared Memory |
|---|---|---|---|---|
| 800 | 1.05393 | 0.1131 | 0.0047007 | 0.00263213 |
| 1000 | 2.05775 | 0.219797 | 0.00916141 | 0.00477453 |
| 1200 | 3.55459 | 0.378601 | 0.015605 | 0.00793862 |
| 1400 | 5.64653 | 0.600016 | 0.024847 | 0.0121216 |
| 1600 | 8.42537 | 0.893907 | 0.0369319 | 0.0177161 |
| 1800 | 12.0064 | 1.27085 | 0.0521852 | 0.0249915 |
| 2000 | 16.4582 | 1.74128 | 0.0722541 | 0.0336659 |