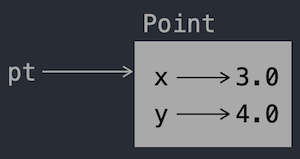
First thing to notice is that you are able to access an instance's attributes directly. In Python there is no built-in mechanism to make attributes private. There are only conventional practices.
The object diagram for our point is:
Recall that in Python everything is an object. In this discussion we will see how to create programmer-defined objects.
An object is the foundation in Object Oriented Programming* for the storage of data. OOP is often referred to a data centric** because of this.
An object has attributes, which can be the variables that hold the data and the functions that act upon the data.
A function inside an object is referred to as a method.
Each object is an instance of a class, and we say that we instantiate an object from a class.
Let's take a look at how to go about creating our own Type.
Our first type will be called Point that will represent a point in two-dimensional space.
Since a point is made up of two coordinates (x, y), we have several options for such a point, such as:
x and y.This third option is the more interesting choice and the one we will explore.
A programmer-defined type is called a class and looks like this:
class Point:
    '''Stores a point as an x,y pair.'''
The class header names the class, Point, in this case and the body consists of a docstring that explains the purpose of the class.
The attributes will be added shortly, but for now let's explore the class itself.
First, let's see what the type is.
class Point:
    '''Stores a point as an x,y pair.'''

print(Point)
print(type(Point))
<class '__main__.Point'>
<class 'type'>
Point is a class object in the global scope (__main__).
Notice how the type of Point is type. Every class is of this type, so think of this as the top level type.
An object is simply an instance of a type, so let's look at that next.
pt = Point()

print(pt)
print(type(pt))
<__main__.Point object at 0x106ea5a00>
<class '__main__.Point'>
pt is a Point object in the global scope and stored in memory at the given address. Notice how the address starts with 0x which indicates hexadecimal notation.
The pt instance is of type Point.
Unlike classes in other languages like Java or C++ which require that attributes be added when the class is defined, in Python you have a lot more flexibility.
You can add/remove attributes to a class skeleton as your needs change.
Let's add some attributes to hold some values.
# Assign the point (3.0, 4,0) to pt.
pt.x = 3.0
pt.y = 4.0

print(pt.x, pt.y)
3.0 4.0
First thing to notice is that you are able to access an instance's attributes directly. In Python there is no built-in mechanism to make attributes private. There are only conventional practices.
The object diagram for our point is:
You may use an object like any other type, and so you may pass an instance as an argument to a function.
def initPoint(pt, x, y):
    pt.x = x
    pt.y = y

def printPoint(pt):
    print(f'({pt.x}, {pt.y})')

printPoint(pt)
initPoint(pt, 1.0, 2.0)
printPoint(pt)
(3.0, 4.0)
(1.0, 2.0)
The initPoint() function accepts a Point instance and two values for x and y. The object referred to by pt is then updated.
The printPoint() function simply prints the instance in the tradional point notation (x, y).
An instance may also be returned from a function.
def makePoint(x, y):
    pt = Point()
    pt.x, pt.y = x, y
    return pt

pt = makePoint(3.0, 4.0)
printPoint(pt)
(3.0, 4.0)
Our next class will be the Rectangle class that represents a rectangle as a Point (lower-left) corner, and its size given as its width and height.
class Rectangle:
    '''Represents a rectangle.

    attributes: width, height, corner (lower-left).'''

rect = Rectangle()

rect.width = 100.0
rect.height = 200.0
rect.corner = makePoint(0.0, 0.0)
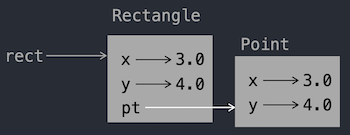
The Rectangle class is composed of another object type, Point. We call this composition and it creates a has-a relenionship between the Rectangle that has a Point.
The object graph for our Rectangle class looks like this now.
Object mutability can be a bit tricky at first so let's review the concept.
The statement:
pt = Point()
create the variable pt, a reference to an instance of the Point class. Although we typically refer to the variable as the instance, in actuality pt is simply an object reference.
The object itself in what Point() returns.
So, there are two distict entities here, the reference and the instance. This sometimes confuses programmers when objects are passed as arguments to functions.
Let's examine both ideas closely with two examples. The first will demonstrate the pass by value mode which Python uses when passing arguments to functions.
def noEffect(p):
    # A local instance is created. Argument not impacted.
    p = makePoint(1.0, 1.0)

pt = makePoint(0.0, 0.0)
printPoint(pt)
noEffect(pt)
printPoint(pt)
(0.0, 0.0)
(0.0, 0.0)
Here we can see that the pt has not changed by the function noEffect(). When pt is passed as an argument it is copied into the parameter p.
Inside the function, the parameter p is assigned a new instance, but the argument pt still points to the original point (0.0, 0.0).
This is better shown with a stack diagram.
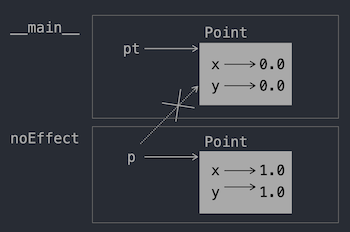
So, the change to the parameter itself, did not impact the argument in any way.
Now, since the object is actually mutable, we can change the instance itself.
Take a look at the next function that does just that.
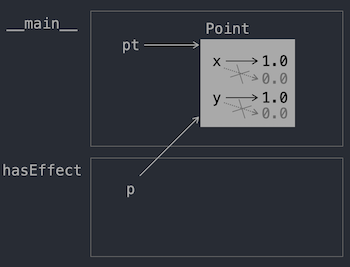
def hasEffect(p):
    p.x, p.y = 1.0, 1.0

pt = makePoint(0.0, 0.0)
printPoint(pt)
hasEffect(pt)
printPoint(pt)
(0.0, 0.0)
(1.0, 1.0)
In this case the instance itself is being updated, and thus the update is reflected in the argument itself.
The stack diagram for this case is:
A more subtle and dangerous issue is the use of aliasing. When you assign one object to another, remember you are assigning the instance reference, thus you wind up with two references to the same object.
Both pt1 and pt2 below refer to the same point.
pt1 = makePoint(0.0, 0.0)
pt2 = pt1

print(pt1)
print(pt2)
<__main__.Point object at 0x106ea51f0>
<__main__.Point object at 0x106ea51f0>
Notice how both objects are located at the same memory location. Any changes made to the instance via one of the references, will be felt by the other.
pt1.x = 2.0

printPoint(pt1)
printPoint(pt2)
(2.0, 0.0)
(2.0, 0.0)
Aliasing makes your code harder to read and follow, and more error prone, so try and avoid it when possible.
Instead, try to copy the object instead. You can use the copy module and the copy() function.
import copy

pt2 = copy.copy(pt1)

print(pt1)
print(pt2)

pt1.y = 2.0
printPoint(pt1)
printPoint(pt2)
<__main__.Point object at 0x106ea51f0>
<__main__.Point object at 0x106ea5c40>
(2.0, 2.0)
(2.0, 0.0)
The copy() function copies or duplicates the instance itself.
Notice now how the two objects are in different memory locations and a change to one object does not affect the other.
The y value for pt2 has not been changed.
When you copy an object that has other objects, you must be careful of shallow copying.
A shallow copy simply copies the reference, it does not duplicate the instance as shown below.
def printRect(rect):
    print(f'x: {rect.corner.x}, y: {rect.corner.y}, w: {rect.width}, h: {rect.height}')

rect1 = Rectangle()
rect1.width, rect1.height, rect1.corner = 10.0, 10.0, makePoint(0.0, 0.0)
rect2 = copy.copy(rect1)

rect2.corner.x = 1.0
rect2.width = 20.0

printRect(rect1)
printRect(rect2)
print(rect1 is rect2)
print(rect1.corner is rect2.corner)
x: 1.0, y: 0.0, w: 10.0, h: 10.0
x: 1.0, y: 0.0, w: 20.0, h: 10.0
False
True
Since the corner is a reference to a Point, the copy simply creates an alias and as such a change to the object via one of the references will be felt in the other.
Notice how the x coordinate has changed in both rect1 and rect2, but the width in rect1 has not.
If you want the change to remain local to the one object, use the deepcopy() function which actually copies the instance as well.
rect1.width, rect1.height = 10.0, 10.0
rect1.corner = makePoint(1.0, 1.0)
rect2 = copy.deepcopy(rect1)
rect2.corner.x = 2.0
rect2.width = 20.0

printRect(rect1)
printRect(rect2)
print(rect1 is rect2)
print(rect1.corner is rect2.corner)
x: 1.0, y: 1.0, w: 10.0, h: 10.0
x: 2.0, y: 1.0, w: 20.0, h: 10.0
False
False
This time around the Point object referred to by corner has been duplicated and thus changes made to rect2 are not felt in rect1.
So, avoid aliasing and instead use copying, with deep copying being the safest and most likely intended.
To get somee practice with deep copying, write a function moveRectangle() that returns a new Rectangle moved by some amount dx and dy.
Refer to my solution below if you have to, but give it an honest try before doing so.
import copy

def moveRectangle(rect, dx, dy):
    '''Returns a new Rectangle moved at the new location.'''

    mr = copy.deepcopy(rect)
    mr.corner.x += dx
    mr.corner.y += dy

    return mr

rect1.width, rect1.height = 10.0, 20.0
rect1.corner = makePoint(0.0, 0.0)

rect2 = moveRectangle(rect1, 10.0, 10.0)
printRect(rect1)
printRect(rect2)
x: 0.0, y: 0.0, w: 10.0, h: 20.0
x: 10.0, y: 10.0, w: 10.0, h: 20.0
Create a separate Python source file (.py) in VSC to complete each exercise.
Write a definition for a class named Circle with attributes center and radius, where center is a Point object and radius is a number.
Instantiate a Circle object that represents a circle with its center at (150, 100) and radius 75.
Write a function named pointInCircle() that takes a Circle and a Point and returns True if the point lies in or on the boundary of the circle.
Write a function named rectInCircle() that takes a Circle and a Rectangle and returns True if the rectangle lies entirely in or on the boundary of the circle.
Write a function named rectCircleOverlap() that takes a Circle and a Rectangle and returns True if any of the corners of the rectangle fall inside the circle. Or as a more challenging version, return True if any part of the rectangle falls inside the circle.